| Figure 5.1: | The render chain of iceWing. |
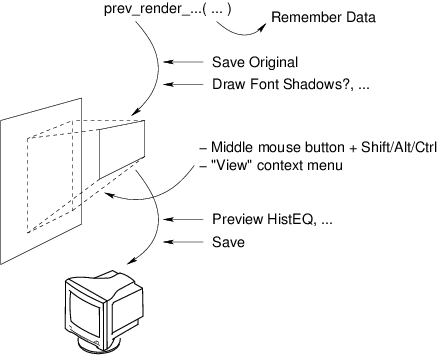
Why should you know this details? Well, you will need to understand the basics of the underlying render mechanism to fully understand how the GUI works and what the many GUI-commands are used for! In iceWing rendering data to image windows is done in several steps. Figure 5.1 shows an overview of the complete rendering process. By using the different GUI commands you can manipulate and inspect the data at different positions of the render chain.
If a plugin wants to display any data, it calls one of the different prev_render_xxx() functions (see section 9.3.2 for an in deep description of these functions). An example is the plugin “grab”, which displays the loaded or grabbed image in the window “Input data”.
The first thing these render functions do is to check the “Remember Data” flag, which is associated to every image window. If the flag is set, the complete data which is passed to the render functions is copied for later use. This allows to re-render the complete image without the help of the plugin. If any of the remaining parameter of the render chain are changed, e.g. the displayed part of the data or the zoom level, the data can be immediately redisplayed. This means, that you can instantly see the effect on your current image. Otherwise, if the flag “Remember Data” is not set, the effect of the changed parameter gets only visible after the next call of the plugin to the prev_render_xxx() functions. For the “grab” plugin for example this means that you see the effect not until the next image is loaded or grabbed.
If an image should be displayed, the data of the complete image can now be saved with the help of the “Save Original” GUI function. Attention: This saves only the first image, not any text, which may be rendered on the image, nor any lines, circles or anything else besides the first image.
The next step in the render chain is the rendering of the data into an internal buffer. During this the data can be modified. E.g. you can add a drop shadow to all displayed text via the context menu of the image windows. Moreover the displayed region and the size/zoom factor can be changed interactively with the mouse. Thus the coordinate system for the data as specified by the plugin (the “world coordinates”) and the coordinate system for the rendered image as displayed on the screen (the “screen coordinates”) are not identical.
The last step in the render chain is the display of the buffer on the screen. During this some color changes, e.g. a histogram equalization, can be applied to the buffer. Besides displaying the result on screen the result can be saved to a file with the help of the “Save” GUI function.
The main window is divided into three main parts: In the middle area you see “Categories” and to its right the page content of the selected category. Most plugins will create at least one entry (called “page”) into the categories-list. It allows you to check/change that plugins parameters. Please see the respective plugin’s documentation for any plugin specific information. In this documentation only the somewhat special categories “Images” and “GrabImage1” will be described in more detail (see sections 5.2.5 and 5.2.3).
Besides these categories you see a menu at the top and some global buttons at the bottom of the iceWing main window:
Load/Save entries in the file menu Loads/saves all made settings from all widgets inside iceWing from/into the file “${HOME}/.icewing/values”, if you selected the “default” variant of the menu entries. The Load/Save entries allow to select the file name. But be aware: this is different to the command “load/save session”, which stores the window size and position of all open windows, not the widget settings.
These functions are as well available as buttons at the bottom of the main window. Here “Def” denotes the “default” versions.
Edit/Preferences This menu entry opens the preference window, where you can configure different settings for the iceWing main program. See section 5.2.2 for a complete description.
The button with the wrench icon opens as well the preference window.
Edit/Enable DACS Output If iceWing outputs any data via DACS, e.g. if you have used the command line parameter “-oi”, toggling this menu entry disables/enables this outputting.
View/Plugin Info Opens the “Plugin Info” window, which shows different information about all loaded and installed plugins. This window is described in more detail in the section 5.2.4.
Help/iceWing Manual Opens the file icewing.pdf, the iceWing documentation you are reading currently, in a PDF viewer.
Help/About iceWing Opens a window showing some information about iceWing, e.g. the version number and the copyright.
Detach/attach symbol (D/A) Clicking this symbol at the top right corner will detach this page into a separate window. Clicking again will put it back into the iceWing main window.
You will use this feature, if you repeatedly wish to flip quickly from one page to another. Or you change the slider on plugin page 1 and want to see the effects on plugin page 2. If you e.g. work on a plugin sheet and wish to single step (Wait Time = -1) through the next images and watch the plugins doing, you surely wish to detach the “GrabImage1” page.
The wrench icon and the corresponding menu entry open the preference window, where you can configure different settings for the iceWing main program. “Image Saving” specifies settings for the save functions in the context menu of image windows. In detail these are
Saving in a vector format, i.e. the “SVG” format, requires that “Remember Data” in the context of the image who’s data should be saved is activated. In this case the complete image must be rerendered, which needs the saved data. See section 5.1 for more details about “Remember Data”. Additionally, some features of the iceWing render functions are not supported by SVG. So the exported images may not be completely identical to the displayed ones.
| %d | : | The consecutive image saving counter, starting at 0. |
| %t | : | The milliseconds part of the time the image gets saved. |
| %T | : | The seconds part of the time the image gets saved. |
| %b | : | The name of the current user. |
| %h | : | The system’s host name. |
| %w | : | The name of the window, from which the image gets saved. |
Any of the above modifiers can be changed by printf() style format specifiers. E.g. “image%03d.ppm” would result in “image000.ppm”, “image001.ppm” and so on as file names.
“Other” has settings for the session handling and the GUI. In detail these are
A session file stores a list of windows and their configuration, their position, their size, and optionally their zoom and panning values. On the next start of iceWing a session file can be loaded, which then will restore the windows and the window configuration.
The category “GrabImage1” has widgets, which specify settings for the plugin “grab”:
Interlace Different grabber camera systems have different methods of sending the video-stream. Here you can select what of the grabbed data should be used. “Both” selects the complete image, “Even” selects only the even field of an interlaced image. “Even + Aspect” grabs only the even field and afterwards halves the image in the horizontal direction to get square pixels again. “Down 2:1/Virtual 2:2” adjusts for grabbed halve field images by halving the image in the horizontal direction and afterwards telling other plugins that the image was downsampled in the vertical direction, too (see also command line parameter “-r”).
Attention: Only some grabbing drivers and additionally only some kernel camera drivers support the grabbing of half fields. So if you specified “-sg” for using a grabber and you set this to something different than “Both” it might well be that the expected does not happen. In this case half field grabbing is not supported with the used configuration of the grabber driver, its configuration and the selected downsampling factor.
Downsampling A ratio of 1 will grab and deliver the image 1:1. But if you e.g. set it to 3, then only every 3rd pixel in both horizontal and vertical direction of the full sized image will be delivered to other plugins - it will become scaled down by a factor of 3. There can be two queues, where the images are stored – one for the original size image and another queue for the downsampled images (see command line parameter “-c” and “-f”).
Grabbing driver options If iceWing was started with the option “-sg” to use a camera, the arguments to this option are shown here. You can change these arguments at runtime. Pressing enter will apply them when a new image is grabbed. The grabber will then be reinitialized with the new arguments. See section 4.2 for a description of all supported arguments.
File TimeStep Every image the plugin “grab” provides to other plugins is marked with a time stamp. E.g. if you use the grabber, the time stamp marks the time the image was grabbed. With this slider you can select the behavior if files from disk should be loaded.
-1 sets the time stamp to the time the image was loaded. Values above 0 specify an increase of the time stamp in ms. E.g. if set to 40 the first image gets a time stamp of 0ms, the second of 40ms, than 80ms …. If this value is set to 0, the frame rate of video files and the values scanned during processing %t and %T in file names specified with option “-sp” are used. See page 36 for further information about %t and %T.
Frame correct Wait Time If this button is not selected, iceWing waits exactly the time slice specified with the next slider before the next image gets acquired. If this button is selected, iceWing adapts this time slice. For example if the processing of the last image took 50ms and the ‘Wait Time’ slider is set to 200ms, iceWing will only wait 150ms.
Wait Time and positioning buttons Sets the delay (in milliseconds), until the next image shall be acquired from disk/grabber. If you set it to -1, iceWing waits until you manually change the image by pressing one of the positioning/acquiring buttons. This -1 works like a “pause-mode”.
Image Num If you work with a video stream on disk, which you have specified with the command line parameter “-sp”, this slider will appear. It shows the current position inside the video stream and allows to seek to an other position.
GrabImage1.Properties If iceWing was started with the option “-sg” to use a camera and the chosen grabber driver supports changing properties on the fly, a GUI in form of an own page in the categories list is created to change these properties interactively. See section 4.2 for a description of the grabber drivers. All drivers with a “propX” option support this.
One widget is shown for every property of the driver and allows to change this property. Additionally, the first widget “Rescan properties” allows to rescan the available properties and show there current value. This may be useful if you used the “Grabbing driver options” widget described above on page 71. When the camera operates in a partial automatic mode, for example auto gain, this can be as well useful to get the current values of all properties.
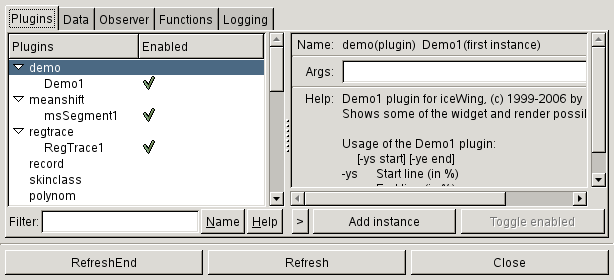
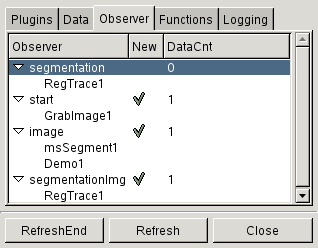
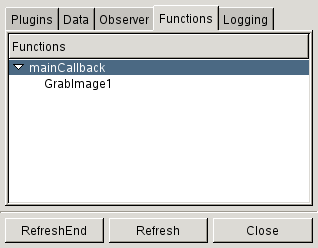
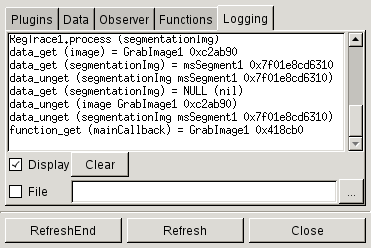
The “Plugin Info” window, which can be opened with the menu entry “View/Plugin Info”, shows different information about plugins iceWing knows about and about the communication between them. Figure 5.2 shows all the different pages of this window.
Inside a main loop iceWing calls the registered plugin instances repeatedly. The order in which the instances get called is defined by the plugins. For this and for the communication between plugins iceWing offers different functionality. Plugin instances can provide new data elements, they can observe the provision of data, and they can call functions of other plugin instances. Details about these communication possibilities as well as details about all known plugins is displayed on the different “Plugin Info” pages. The displayed information is not continously updated. By pressing “Refresh” the current internal state about the communication information is displayed immediately. “RefreshEnd” defers the display shortly before the end of the main loop, directly before any floating data with a reference count of zero gets deleted (see below). By pressing “RefreshEnd” you will get in most of cases information about all data, which was provided during the last main loop iteration.
The filter bar directly below the list allows to limit the displayed plugins. Only plugins who’s name or who’s help string contain a certain string are shown in the list. The search is case insensitive.
A double-click on one of the plugin instances (de)activates the instance. If an instance is deactivated the process() function of this plugin instance is not called anymore. This is similar in effect to the command line parameter “-d”. This function can be selected as well in the context menu of the list and via the button “Toggle enabled”. The button “Add instance” and the corresponding context menu entry create at the start of the next main loop run a new instance of the currently selected plugin. This is similar to specifying “-l pluginName” on the command line. The string in the “Args:” entry box specifies the command line arguments for the new instance.
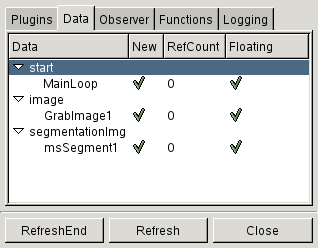
The category “Images” shows a list of all image windows that the plugins wish to display. Double-clicking an entry of the list opens or closes the window of that entry.
Every of these image windows iceWing or any plugin creates will have different standard menu entries in a context menu. You can access this menu by clicking with the right mouse button in an open image window. Depending on the things a plugin renders in the image, there might be additional plugin specific entries.
Here is a list of entries you will find in all or, partly, a lot of image windows:
File/Save Saves the actual visible window content, including all active rendering manipulations. In the preference window of iceWing you can specify different parameters for the saving process, e.g. the file name and the file format.
File/Save Original Saves the underlying original “world coordinate” image, without any active rendering manipulations, in the original color space (for example YUV). But if the downsample factor (page “other”) is >1, you will still save downsampled images. This downsampling happens inside the plugin “grab” before the original images are anyhow rendered in a image window or passed to further iceWing plugins. Moreover this function does not save any texts, lines, regions, or anything else besides images the plugin may display in the image. Only the first image is saved.
File/Save Seq Once activated, every new acquired image (the visible window content, including all active rendering manipulations) is saved continuously until deactivated. Normally, if the active image format is for single images, a series of image files gets stored. Otherwise, if one of the AVI file formats is selected, a single video-stream file is stored. You can change this format in the preferences window, see section 5.2.2 for further details.
Caution! If you have selected on of the AVI formats in the preference window, you must remember: To prevent corrupt AVI files, you must end this “Save Seq” by (de)selecting this command in the context menu again and continue with at least one new image to close the saved AVI file. Alternatively while recording you can close the whole image window or end iceWing with the “Quit” button, and iceWing sends the close file command itself. Changing the Image format in the preference window will do the same. If the file is not closed the AVI will miss some finalizing code and thus will be corrupt.
File/Save OrigSeq Same as “Save Seq”, but the original “world coordinate” images are used. For the data, which gets saved by this function the same as already stated under “Save Original” applies.
File/Save Session Saves the current iceWing window configuration under the currently active session name. On the next start of iceWing every currently open window will be remembered as it is. Without any special parameters the next time iceWing is launched, the default configuration-file in “${HOME}/.icewing/session” will be used to restore any windows. Alternatively, the command line parameter “-ses <session-file>” can be used to switch to non-default session files.
The Save/Clear Session menu entries are the same commands as the ones in the preferences-window.
File/Clear Session This physically deletes the current session file and thus clears the session. At the next launch the window layout of iceWing will look like the inbuilt default.
File/Close Window Closes the window.
View The View submenu contains different entries to zoom and pan inside the image windows. So these entries are alternatives to the middle mouse button and the scroll whell. See section 5.2.6 for more details. The menu is especially handy if the entries are called via hotkeys. Besides using predefined hotkeys, the hotkeys of all menu entries can be dynamically changed. If a menu entry has currently the focus of the mouse a new hotkey can be set by simply pressing the desired hotkey. All hotkeys are saved in the configuration file.
Info Window Opens a small window, which displays the coordinates and color in several color spaces of the pixel at the mouse position if the mouse is inside any image window. Additionally, if the mouse is over any rendered images, the “Original” tab shows information about the data at the mouse position as it was passed to the iceWing render functions. For example iceWing can display images containing float values, which are converted to 8 bit integer values during display. Possibly, these values are further changed by any special rendering filters or any drawings, which are shown above the image. These final 8 bit values are then displayed as the color values. In contrast, the “Original” tab shows the float values from the inital image.
The spin button allows to set the radius of the square area, from which the displayed color values are averaged. A radius of “0” uses only the pixel under the mouse cursor. The “Original” tab considers the zooming value. The “Display” tab ignores the zoom value.
Additionally, this window contains two toggle buttons for two special functions. If the “color picker” is pressed, the info window waits on a press with the left mouse button inside one of the image windows. The values at the time the button was pressed are then additionally displayed in the info window. Thus two positions can be easily compared. If “measure” is pressed, distances and angles in the image windows can be measured. If the left mouse button is pressed inside an image window and then moved to a second position, the distance of these two positions and the angle between a horizontal line and the marked line are displayed in the info window. Afterwards, to change the initially selected line, the end points of the marked line can be dragged around.
Remember Data (De-)activates the “Remember Data” mode, that was already discussed in detail in section 5.1.
Settings
Opens a window, where you can change some further image window related
options. As one point different options for the “Show Meta info” feature and the
image rendering can be specified. Moreover, all plugins can add any widgets to
this window. For a description of these options please refer to the special plugin
documentation.
The meta info / image rendering related options are:
All other values for the sliders consider the minimal and maximal values of the to be displayed image. The Min slider specifies the amount, the minimal value is shifted towards the maximal value, in percent of the difference of the minimal value and the maximal value. The Max slider shifts the maximal value towards the minimal value. All pixels darker then the shifted minimal value are displayed as black, all pixels lighter then the maximum are displayed as white, and everything in between is stretched linearly.
Entries of the submenu Preview
Equalization is used to repair images that have too much contrast or are too light or dark. Equalization attempts to flatten the histogram of the image.
Colors of the original image, that look very similar, change to very distinguishable colors. This is very useful to e.g. verify some color-separation processes.
Show MetaInfo This menu entry appears only if images are displayed in the window. “Show MetaInfo” (de-)activates the display of some additional information of the original image as passed to the render functions, for example the color-space of the input image, the size of the image in pixels and the color histogram of the image.
Font This menu entry appears only if text may be displayed in the window. Selects the font and thus the size of any text, which get rendered inside the image window (for example the text shown if the meta info is activated).
Font Shadows This menu entry appears only if text may be displayed in the window. Shows the rendered text with shadowed fonts. Helps sometimes to make the text more visible.
If a new image window is opened the rendered image is normally displayed in such a zoom level that it is always completely visible. By pressing the shift key and the middle mouse button inside the window you can zoom into the image, by pressing the ctrl key and the middle mouse button you can zoom out. Alt plus the middle mouse button resets to the initial fit to window displaying mode. If fit to window is not active you can hold the middle mouse button and move around inside the window to move the clipping frame for the “world coordinate” picture, i.e. to pan inside the image.
Attention:
If your window manager is already using one or more of that combinations for itself, then
that signal can not reach iceWing! If you want to use the function, you have to change your
window manager setting: Disable that mouse signal there, so it will no longer get caught by
your window manager and can reach iceWing.
Besides using the middle mouse button for zooming and panning, there are two additional posibilities to reach these functions: by using the mouse wheel or the context menu. For panning the window vertical, again if fit to window is not active, you can use the mouse wheel. Panning horizontally can be done with the mouse wheel while pressing the shift key and zooming by using the mouse whell while the ctrl key is pressed. Additionally, the image context menu contains a submenu “View” with entries for all these functions.
(TODO: FULL list, or only short summary?) Widget “List” can have a context menu. And it can be reordered via drag’n drop...
In Goptions.h opts_xxx_create()