| Figure 3.1: | The main window of iceWing. |
In this quicktour you will get a short overview over iceWing and experiment with its GUI. For this you will start a session with a small video as input and then play a bit with a demo plugin. With the sources of iceWing you got a small video, which you can use during this tour. It can be found in the docs directory under the name “quicktour.avi”. Alternatively, you can choose any other image or video (of a format, that iceWing supports).
Compiling the plugin
During installation of iceWing the demo plugin was not compiled and installed. So let’s
do that now.
> cd {wherever your iceWing-sources are}
> cd plugins/demo
Now make sure that you have ${PREFIX}/bin in the default-execute path or,
alternatively, change the Makefile in the current directory. The Makefile needs to find
“icewing-config”, which was installed in ${PREFIX}/bin. Then simply
> make
depend
> make
> make install
This compiles the demo plugin and installs it under the name libdemo.so in the directory
${PREFIX}/lib/iceWing, where iceWing can find it automatically.
The quick tour You tell by command line parameters from where iceWing will take its images. There are several kinds of sources:
So let’s jump in and start iceWing with the example plugin “demo”: You launch iceWing
in the shell-command line with (as one single line, after changing to the right directory)
> cd {wherever your iceWing-sources are}
> icewing -sp docs/quicktour.avi -l demo
After this, iceWing opens its main window. At the same time on the starting console
iceWing and the plugin write constantly their status.
In figure 3.1 you see the iceWing main GUI, so lets explore some things. On the left side you see the “Categories” area, which has now “Images” and “GrabImage1” and some plugin pages.
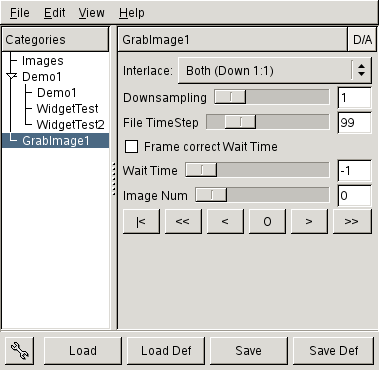
The category “GrabImage1” Click on “GrabImage1” to activate this page belonging to the grabbing plugin, the plugin responsible for accessing images. You can see several sliders on the right side. If you have during a session as data source not a video stream but one single image, “Image Num” will always be set to 0. None the less iceWing has still the option to (re)acquire that single image on a timely basis: The slider “Wait Time” sets the delay (in ms), after that this (for video-streams: next) image shall be acquired automatically. If set to -1, iceWing waits until you click manually the read buttons below. So now set the wait time to 200ms, and you see the mass of console output greatly reduced.
The plugin pages You also launched with the command line parameter “-l” one instance of the plugin “demo”, which is inside libdemo.so. Every plugin can generate none or more page-entries on the left “Category” side. By selecting the pages you can view plugin status or change the plugin parameters on the right side. Page “Demo1” has some options, that directly affect the plugin. “Demo1 WidgetTest” and “Demo1 WidgetTest2” not do anything useful. But they show you all the available GUI-elements of iceWing, that can also be easily used by your own plugins.
| Figure 3.2: | (a) The page “Images”. (b) The context menu of window “Demo1 image” with all its submenus. |
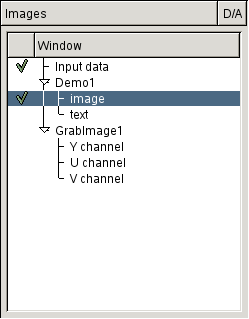
How to display plugin results? With click on category “Images” you see on the page on the right side several “Window” entries coming up (see figure 3.2(a)). They show you all windows that the plugins wish to display. Double-click (de)activates the window of that entry and you can see what the plugins are doing.
You see one window “Input data” for the current input image, one separate window for each YUV channel of the source image and two windows for the output of the plugin instance “Demo1”.
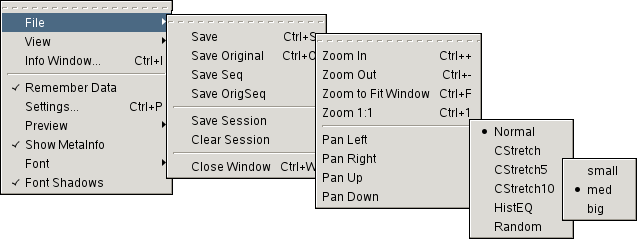
Lets now activate the first demo window called “Demo1.image”. Inside this new window press the right mouse button and verify that “Remember Data” is active (see figure 3.2(b)). This flag makes all coming zoom commands operate on the currently loaded image data, not only on new acquired/grabbed images. If you deselect this option, and e.g. try to zoom around, the zoom commands will still be remembered - but the window content will still display (unchanged until next image reading) the last acquired image without any of the zoom commands visible. When you set “Wait Time” = -1, you see the “Remember Data” flag’s functionality very clear: When “Remember Data” is inactive, only reloading the image source will refresh the window content and show your until then done zooms.
Zooming the window content Inside the window shift/crtl/alt-keys plus middle mouse button zoom in/out/reset the image. When you just hold the middle button and move the mouse around, you can pan inside the image, if you have zoomed into it. Additionally, you can use the scroll whell and the shift and ctrl-keys to pan and zoom in the window, or, as a third option, the “View” context menu. If you have problems with the zooming, look at the section 5.2.6 “Panning/Zooming the image windows”.
Now play a bit with the “Remember Data” flag and “Wait Time” and zooming to work it out.
Manipulating image colors In the context menu (right mouse button) you can see the “Preview->Random” option. This tool randomizes the color assignments. This can be useful to verify the output of a color separating plugin, because very similar/neighbored colors now get very distinguishable.
Saving the zoomed part into a separate file After you played around a bit, you can safe the frame content into a file with context menu entry “File/Save”. The picture will be the window content and its name be “Gsnap_0.ppm”. If you wish a different name/format, you can change this (and more) by clicking the wrench icon of the main Window (see figure 3.1) to get the preferences window. There you can change the image name to e.g. “quicktour_zoomed_%d.ppm” (the %d is a placeholder for the image number).
More about this plugin via “Plugin info” From the menu in the main window (figure 3.1) select “View/Plugin Info”. Here you see how the plugin instance “Demo1” is integrated into the iceWing system, You see the sheet and the only two enabled plugins with own instances are “Demo1” and “GrabImage1”. The plugin instance “GrabImage1” from the “grab” plugin is needed to acquire the image from hard disk (command line parameter “-sp”). All other plugins (“record” etc.) are further inbuilt or installed ones, but they are not registered into the current session of iceWing and thus have no active instances.
More of this all later in the section 5.2.4 “Plugin Info”...
The plugin “grab” is a very basic and thus inbuilt plugin, that allows to acquire images or video streams from grabber hardware, disk or via DACS from external processes. This plugin will be used by nearly all other image processing plugins. But iceWing not needs this plugin! But then you need your own plugin as “data-provider” for e.g. audio streams or likewise.
Some comments on up-/downsampling iceWing provides the images via the plugin “grab” (or other data-provider plugins). And the plugin “grab” provides two separate queues of image histories: downsampled and upsampled (i.e. full/original sized) images. With a downsample factor of 1 the two queues have the same images, while a factor of 3 makes the downsampled images consist of every 3rd pixel of the original sized image. Both queues have a history size - how many images will be stored for plugin access to older images. Excellent - but what for?
Well, this feature is useful when both reduced and detailed image size versions are needed for the global task. E.g. a continously operating plugin “trajectory tracking” uses the faster downsampled images to swiftly keep track of the hand-position. Meanwhile, but much less frequently, another very time-intensive plugin “object detection” separates an object in that hand. For this job, it may register for the more detailed queue of upsampled images.